


awstats是一个免费非常简洁而且强大有个性的基于Perl语言的WEB日志分析工具。
它可以统计网站的如下信息:
1):访问量、访问次数、页面浏览量、点击数、数据流量等。
2):精确到每月、每日、每小时的数据。
3):访问者国家以及IP。
4):Robots/Spiders的统计。
5):访客持续时间。
6):对不同files type的统计信息。
7):Pages-URL的统计。
8):访客操作系统浏览器等信息。
9):其它信息(搜索关键字等等)
在介绍完awstats是什么之后,我们再来介绍下安装awstats之前的准备工作。
一、准备工作
1 .安装GeoIP
GeoIP主要用于定位访问者所属的国家以及城市的数据库,可以使用如下命令进行安装:
yum -y install GeoIP GeoIP-devel perl-Geo-IP
2.检查GeoIP安装的相关组件,如下:
rpm -ql GeoIP-GeoLite-data
rpm -ql GeoIP-GeoLite-data-extra
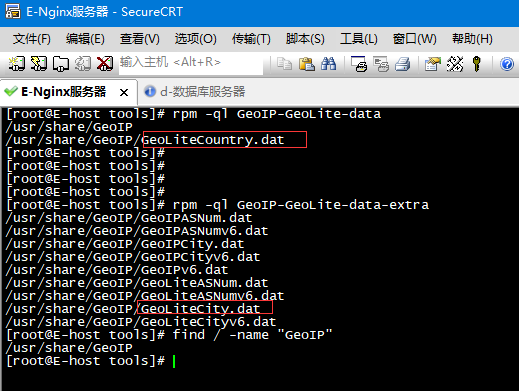
在上述截图的安装的文件中,我们只需要关注GeoLiteCountry.dat和GeoLiteCity.dat这两个文件即可,其中GeoLiteCountry.dat用于定位访问者所属的国家,而GeoLiteCity.dat用于定位访问者所属的城市。
3.如果是ubuntu系统,可以使用如下命令进行安装
sudo apt-get -y install geoip-bin geoip-database-contrib php5-geoip python-geoip python-geoip-dbg libgeoip1 libgeoip-dev
4. 安装httpd-tools
yum -y install httpd-tools
5.安装httpd-tools时,会自动安装httpd,所以我们需要把httpd禁用停止掉。命令如下:
/etc/init.d/httpd stop
chkconfig httpd off
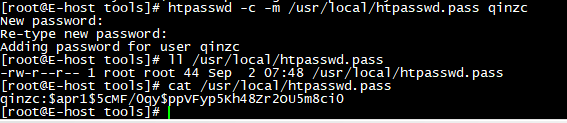
一般站长都不愿随便让其他人知道自己网站的真实流量,所以要把awstats统计结果页面进行密码保护。
因为nginx使用的是跟apache一样的密码加密格式,所以这里需要用到apache自带的工具htpasswd,而htpasswd包含在httpd-tools组件中的,所以我们要安装httpd-tools。
6.生成密码文件,使用如下命令:
htpasswd -c -m /usr/local/htpasswd.pass qinzc

echo "qinzc:$apr1$5cMF/0qy$ppVFyp5Kh48Zr2OU5m8ci0">/usr/local/htpasswd.pass
chmod 644 /usr/local/htpasswd.pass
二、安装awstats
准备工作做完后,我们现在来安装awstats。
1. 下载awstats,官网是http://www.awstats.org/,下载最新版本的 awstats。如下:
wget http://www.awstats.org/files/awstats-7.5.tar.gz
2.awstats下载完毕后,我们现在来安装awstats。解压安装包,并进行相关操作,如下:
tar -C /usr/local/ -xf awstats-7.5.tar.gz
mv /usr/local/awstats-7.5/ /usr/local/awstats
chown root:root -R /usr/local/awstats/
mkdir -p /var/www/awstats/
cd /usr/local/awstats/tools/
chmod +x /usr/local/awstats/tools/*.pl
chmod +x /usr/local/awstats/wwwroot/cgi-bin/*.pl
3.开始安装awstats,如下:
/usr/share/awstats/tools/awstats_configure.pl
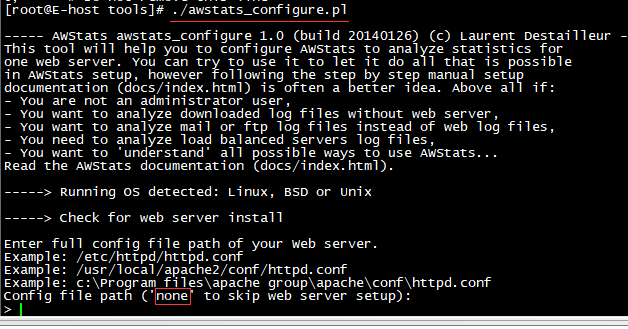
因为在此我们使用的是nginx,所以以上截图填写 none 跳过Web服务器设置
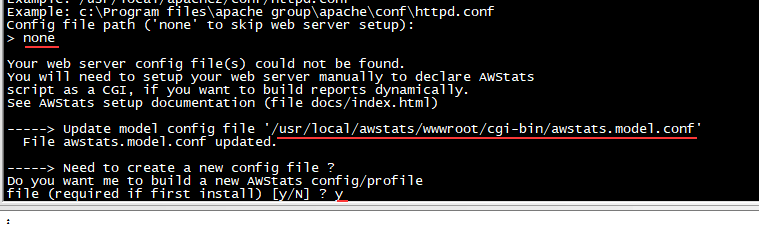
是否创建新的AWSTATS配置文件,这里选择 y 进入下一步
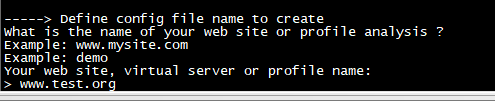
您的网站、虚拟服务器或配置文件名称,在这输入自己的网站域名,也可以进行自定义
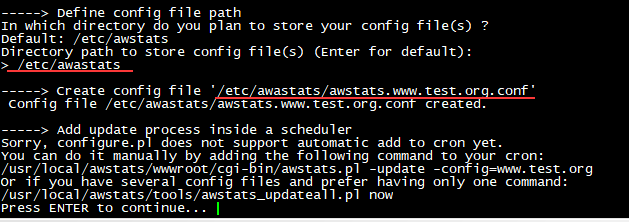
使用默认配置,生成配置文件。输入:/etc/awstats
4.安装程序执行结束后,会在/etc/awstats/目录下生成相应的配置文件。如下查看:
ll /etc/awstats/
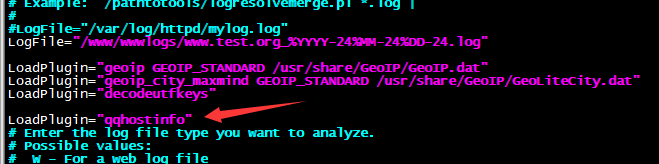
5. awstats安装完毕后,我们现在来修改其配置文件awstats.www.test.org.conf。在该配置文件中,我们主要修改的是awstats分析nginx日志的路径,以及日志格式,当然还有其它的一些插件。如下:
vim /etc/awstats/awstats.www.test.org.conf
LogFile="/www/wwwlogs/此处为你要分析的日志文件.log

#配置显示国家和地区

LoadPlugin="geoip GEOIP_STANDARD /usr/share/GeoIP/GeoIP.dat"

LoadPlugin="geoip_city_maxmind GEOIP_STANDARD /usr/share/GeoIP/GeoLiteCity.dat"

#解决搜索关键字的乱码

LoadPlugin="decodeutfkeys"

6.安装纯真IP数据库插件点击下载:
如果要详细显示国内访客的具体来源信息,我们可以使用纯真IP数据库插件。
纯真IP地址数据库下载地址:http://update.cz88.net/soft/setup.zip
在windows机器上下载安装后,安装目录下的qqwry.dat文件即是最新版IP地址数据库。

下载awstats纯真IP数据库解析插件,下载地址如下:
http://down.51cto.com/data/1888530
注意,附件qqhostinfo.pm、qqwry.pl里的文件路径已经修改好。
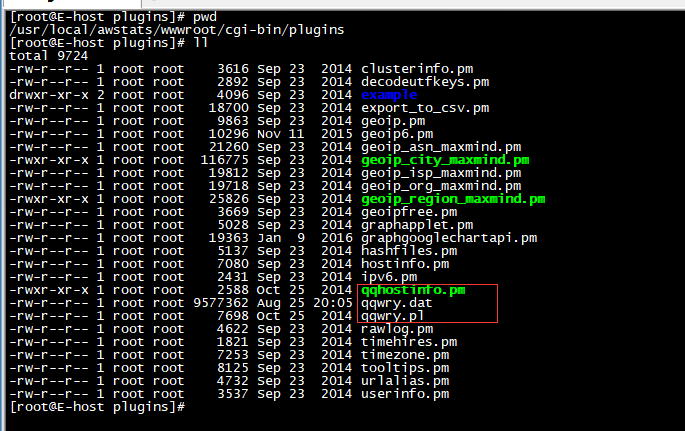
7.下载完毕后,把qqhostinfo.pm、qqwry.pl、qqwry.dat这三个文件,放到awstats的wwwroot/cgi-bin/plugins目录下,
并且给予qqhostinfo.pm文件可执行权限。如下:
[root@E-host plugins]# chmod +x qqhostinfo.pm
8.最后修改awstats的配置文件awstats.www.ilanni.com.conf添加LoadPlugin="qqhostinfo"选项,如下:
vim /etc/awstats/awstats.www.test.org.conf

LoadPlugin="qqhostinfo"
到此awstats安装和配置已经全部完成。
三、配置nginx日志格式
awstats安装完毕后,我们要配置nginx日志的格式,因为awstats是按照指定的格式对nginx日志文件进行分析的,所以我们要进行对应的配置。
1.nginx日志的配置方法如下(http标签下配置):
[root@E-host plugins]# vim /www/server/nginx/conf/nginx.conf

log_format  site  '$remote_addr - $remote_user [$time_local] "$request" '
             '$status $body_bytes_sent "$http_referer" '
             '"$http_user_agent" $http_x_forwarded_for';
四、awstats与nginx进行集成
Nginx日志格式配置完毕后,我们现在要把awstats与nginx进行集成。
为什么awstats与nginx进行集成?因为awstats的访问是通过web方式进行的。这个集成也分为两种情况 ,一个是awstats单独以nginx虚拟主机的形式存在,一种是awstats与现有nginx虚拟主机进行集成。下面分别把这两种方式的nginx配置贴出来,如下:
1.awstats单独作为nginx的一个虚拟主机,配置文件:
server {
        listen 80;
        server_name www.test.org;
root /var/www/awstats/;
index index.html;
#或者
#index  awstats.test.haiyn.com.html;
        location ~ ^/cgi-bin/.*.(cgi|pl|py|rb) {
        gzip off;
        include         fastcgi_params;
        fastcgi_pass  unix:/tmp/php-cgi.sock;
        #fastcgi_pass    127.0.0.1:9000;   #注意配置fastcgi_pass为你的php-fpm server.
        fastcgi_index   cgi-bin.php;
        fastcgi_param   SCRIPT_FILENAME /usr/local/awstats/wwwroot/cgi-bin/fcgi.php;  #注意文件路径
        fastcgi_param   SCRIPT_NAME        /cgi-bin/fcgi.php;
        fastcgi_param   X_SCRIPT_FILENAME /usr/local/awstats/wwwroot$fastcgi_script_name;  #注意文件路径
        fastcgi_param   X_SCRIPT_NAME $fastcgi_script_name;
        fastcgi_param   REMOTE_USER        $remote_user;
        }
        # Static awstats files: HTML files stored in DOCUMENT_ROOT/awstats/
        location /classes/ {
                alias /usr/local/awstats/wwwroot/classes/;
        }
        location /css/ {
                alias /usr/local/awstats/wwwroot/css/;
        }
        location /js/ {
                alias /usr/local/awstats/wwwroot/js/;
        }
        location /icon/ {
          alias /usr/local/awstats/wwwroot/icon/;
      }
}2.awstats与现有nginx虚拟主机进行集成。
注意:一定要把awstats相关的配置存放到最前面,这是因为nginx的匹配规则是从上到下进行匹配的。
server {
        listen 80;
        server_name www.test.org test.org;
        charset utf-8;
        access_log /var/log/nginx/www_test_org.log main;
        location ~ ^/icon/ { #图标目录
                root /usr/local/awstats/wwwroot;
                index index.html;
                access_log off;
                charset gb2312;
                            }

        location ~ ^/cgi-bin/.*.(cgi|pl|py|rb) {
                root /usr/local/awstats/wwwroot;
                gzip off;
                include fastcgi_params;
               #fastcgi_pass 127.0.0.1:9000;
                fastcgi_param X_SCRIPT_NAME $fastcgi_script_name;
                fastcgi_param SCRIPT_FILENAME $document_root/cgi-bin/fcgi.php;
                fastcgi_param X_SCRIPT_FILENAME $document_root$fastcgi_script_name;
                #fastcgi_param REMOTE_USER $remote_user;
                auth_basic "Restricted";
                auth_basic_user_file /usr/local/htpasswd.pass;
                                               }
        location / {
                root /www/test.org;
                index index.php index.html index.htm;
                    }
        location ~ \.php$ {
                root /www/test.org/;
               #fastcgi_pass 127.0.0.1:9000;
                fastcgi_index index.php;
                fastcgi_param SCRIPT_FILENAME $document_root$fastcgi_script_name;
                include fastcgi_params;
                            }
        }
五、生成awstats数据库
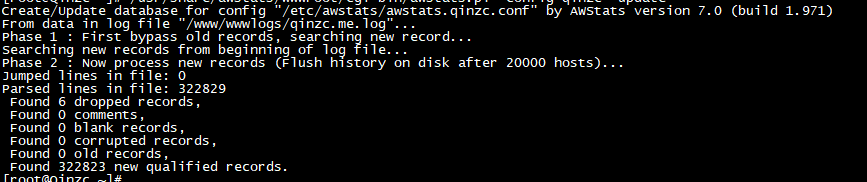
1.现在开始使用awstats分析日志,使用如下命令:
/usr/local/awstats/wwwroot/cgi-bin/awstats.pl -update -config=www.test.org
2.生成静态文件,使用如下命令:
/usr/local/awstats/tools/awstats_buildstaticpages.pl -update -config=www.test.org -lang=cn -dir=/var/www/awstats -awstatsprog=/usr/local/awstats/wwwroot/cgi-bin/awstats.pl
3.访问awstats如下:
http://www.test.org/cgi-bin/awstats.pl
快速安装:
yum -y install awstats
cp awstats.model.conf awstats.www.qinzc.me.conf
vim awstats.www.qinzc.me.conf
/usr/share/awstats/wwwroot/cgi-bin/awstats.pl -config=www.qinzc.me
/usr/share/awstats/wwwroot/cgi-bin/awstats.pl -config=www.qinzc.me -update
/usr/share/awstats/wwwroot/cgi-bin/awstats.pl -config=www.qinzc.me -output -staticlink >/www/wwwroot/qinzc.me/rzjl/index.html
/usr/share/awstats/wwwroot/cgi-bin/awstats.pl -config=www.qinzc.me -output -staticlink >/www/wwwroot/qinzc.me/rzjl/index.html


 桂ICP备16010384号-1
停留在世界边缘,与之惜别