


环境
| 角色 | 外部IP地址 | 内部IP地址 |
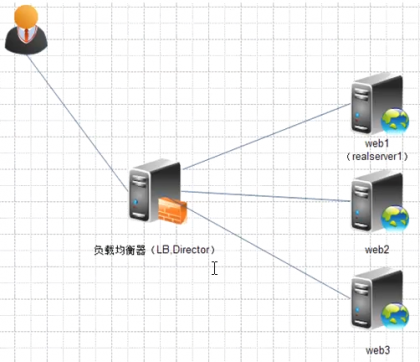
| LVS调度器(Director) | 10.10.0.9 | 10.10.0.10 |
| RS1(真实服务器) | 10.10.0.12 | |
| RS2(真实服务器 | 10.10.0.13 |
[root@F-LVS ~]# cat /etc/redhat-release
CentOS release 6.9 (Final)
[root@F-LVS ~]# uname -r
2.6.32-696.el6.x86_64
[root@F-LVS ~]# lsmod|grep ip_vs //查看是否安装此模块
准备工作
#安装了内核开发包
yum install -y  kernel kernel-devel libnl* popt* gcc gcc-c++ openssl-devel libnfnetlink-devel

#重启
reboot

#重启后做链接
ln -s /usr/src/kernels/`uname -r`/ /usr/src/linux
1.安装LVS软件
wget http://www.linuxvirtualserver.org/software/kernel-2.6/ipvsadm-1.26.tar.gz
tar zxf ipvsadm-1.26.tar.gz
cd ipvsadm-1.26
make
make install
modprobe ip_vs
#或输入:/sbin/ipvsadm
#检查是否加载成功
lsmod |grep ip_vs
2.安装keepalived软件
wget
tar zxf keepalived-2.0.7.tar.gz
cd keepalived-2.0.7
./configure
make
make install

===========或者:  yum -y install keepalived ===========
===========或者:  yum -y install keepalived ===========
===========或者:  yum -y install keepalived ===========
#启动

/etc/init.d/keepalived start
帮助:
man keepalived.conf

#注意,用keepalived,用普通方法ifconfig 看不到IP地址,使用ip add即可
日志地址 tail -f /var/log/messages

3.keepalived配置
vim /etc/keepalived/keepalived.conf
主LVS负载均衡 MASTER
! Configuration File for keepalived

global_defs {
   notification_email {
   542129333@qq.com
   }
   notification_email_from xxxx@qq.com
   smtp_server 10.0.0.1
   smtp_connect_timeout 30
   router_id LVS_1
}

vrrp_instance VI_1 {
    state MASTER
    interface eth0
    virtual_router_id 55
    priority 150
    advert_int 1
    authentication {
        auth_type PASS
        auth_pass 1111
    }
    virtual_ipaddress {
        10.10.0.9/24
    }
}

virtual_server 10.10.0.9 80 {
    delay_loop 6
    lb_algo wrr
    lb_kind DR
    nat_mask 255.255.255.0
    persistence_timeout 0
    protocol TCP
    real_server 10.10.0.12 80 {
        weight 3
        TCP_CHECK {
        connect_timeout 10
        nb_get_retry 3
        delay_before_retry 3
        connect_port 80
        }
    }
    real_server 10.10.0.13 80 {
        weight 3
        TCP_CHECK {
        connect_timeout 10
        nb_get_retry 3
        delay_before_retry 3
        connect_port 80
        }
     }

}
备LVS负载均衡配置: BACKUP
! Configuration File for keepalived

global_defs {
   notification_email {
   542129333@qq.com
   }
   notification_email_from xxxx@qq.com
   smtp_server 10.0.0.1
   smtp_connect_timeout 30
   router_id LVS_2
}

vrrp_instance VI_1 {
    state BACKUP
    interface eth0
    virtual_router_id 55
    priority 100
    advert_int 1
    authentication {
        auth_type PASS
        auth_pass 1111
    }
    virtual_ipaddress {
        10.10.0.9/24
    }
}

virtual_server 10.10.0.9 80 {
    delay_loop 6
    lb_algo wrr
    lb_kind DR
    nat_mask 255.255.255.0
    persistence_timeout 300
    protocol TCP
    real_server 10.10.0.12 80 {
        weight 3
        TCP_CHECK {
        connect_timeout 10
        nb_get_retry 3
        delay_before_retry 3
        connect_port 80
        }
    }
    real_server 10.10.0.13 80 {
        weight 3
        TCP_CHECK {
        connect_timeout 10
        nb_get_retry 3
        delay_before_retry 3
        connect_port 80
        }
     }

}
4.手动配置抑制ARP响应(RS上配置)
echo "1" >/proc/sys/net/ipv4/conf/lo/arp_ignore
echo "2" >/proc/sys/net/ipv4/conf/lo/arp_announce
echo "1" >/proc/sys/net/ipv4/conf/all/arp_ignore
echo "2" >/proc/sys/net/ipv4/conf/all/arp_announce
ARP抑制配置思路
1.如果是单个VIP,那么可以用stop传参设置0
2.如果RS端有多个VIP绑定,此时,及使是停止VIP绑定也一定不要置0
ARP广播而进行新的地址解析。具体命令:
/sbin/arping -I eth0 -c 3 -s 10.10.0.9 192.168.1.1(网关IP)
/sbin/arping -U -I eth0 10.10.0.9


 桂ICP备16010384号-1
停留在世界边缘,与之惜别